Wednesday 18 December 2013

Mind Maps in Software Testing

Getting Started With Mobile Testing – A Mind Map

 What is Mind Mapping?

A mind map is a graphical representation of ideas and concepts. It is a creative and logical way of advanced note-taking using symbols, colors, mind shapes, words, lines and images. This helps you to structuring information, helping you to understand requirements in better way, helps you to analyze, to cover the data comprehensively and moreover its fun!!
Why Mind Map is Required?
When we have many conventional methods why we need mind map? How this is different from concept maps.
  • Increases  creativity
  • Simple to implement the idea in creative way
  • Very flexible and easy to maintain the mind maps.
  • Provide more coverage.
  • Can position all the data at one place (you need visit different portals every time).
  • Can represent to management without any hurdle and confusion.
  • We can mark different areas in different way to make it more attractive.
Where Mind Maps Can Be Used For:
Mind map is not limited for particular problems and ideas. It is open to create maps for every idea you have. Just you need to have good idea and intuitive knowledge about the subject.
  • Problem solving
  • Structural representations
  • Team planning
  • Condensing material into compact and effective format
  • To graph team activity.

Mind Map in Software Testing

Testing is huge area of ideas and creativity . Every phase of testing has its own method and terminologies. It is up to the individual where to apply mind map in software testing. It is always advisable to have good understanding and ground work of internal branches of testing phase which you are planning to chalk out. We need to collect all those thoughts into one place.

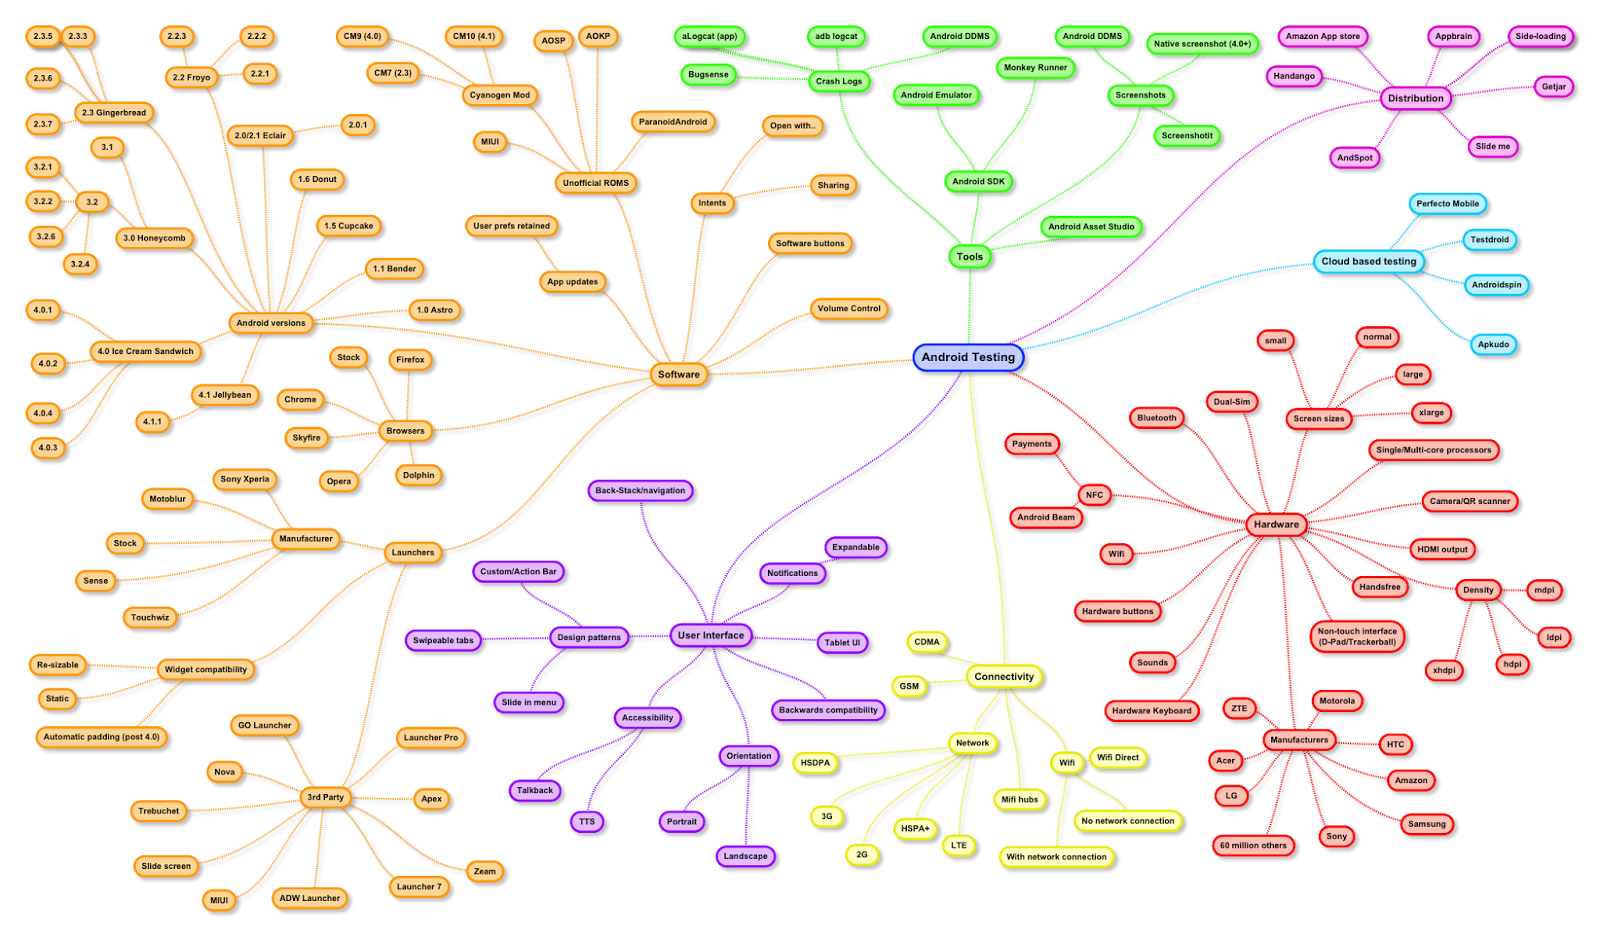
Android Testing Mind Map

You can get all parameters to test "what should get covered while testing Android application or Android website project."


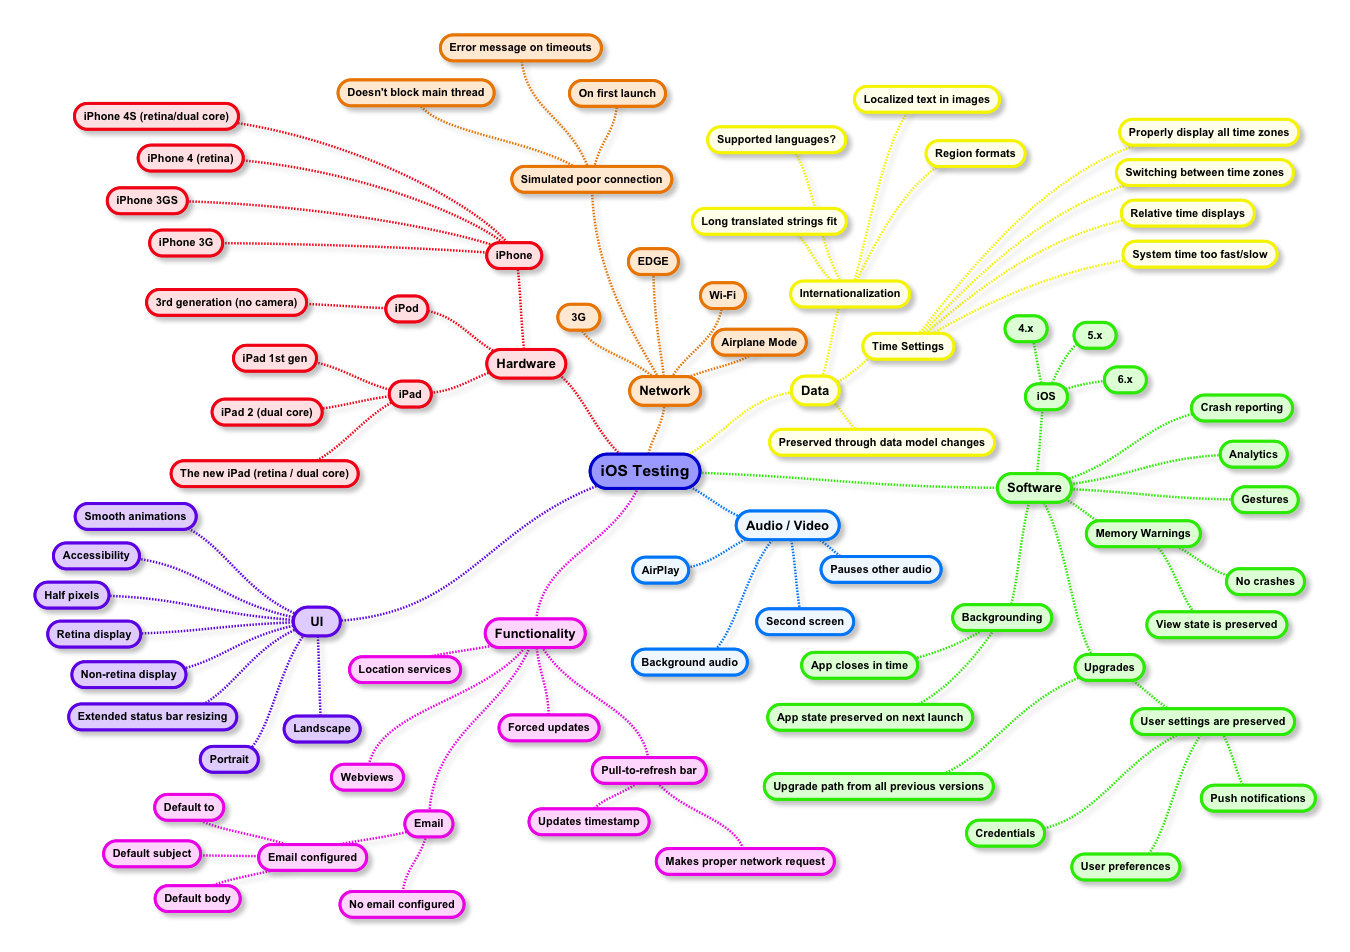
iOS Testing Mind Map

 Initial attempt at creating an iOS MindMap by Nick and Bernard  Perhaps everyone should give some friendly encouragement! 


Thanks
-http://www.softwaretestinghelp.com/
-Minisrty of testing

Saturday 16 November 2013

iOS Build Installation

Instructions for Windows

a) If you receive an .ipa file:
  1. Connect your iPhone/iPod touch/iPad to the computer.
  2. Double-click on the .ipa file. This will open iTunes and add the app to your collection.
  3. Synchronize your applications.
b) If you receive a zip file with a file with “.mobileprovision” extension and a folder containing the app:
Do not open the app folder or Windows might tamper with its contents.
  1. Connect your iPhone/iPod touch to the computer
  2. Open iTunes if it didn’t open automatically
  3. Locate your device in iTunes and go to the Applications tab
  4. Drag the “.mobileprovision” file to the Applications tab
  5. Also drag the app folder
  6. Synchronize your applications
The app should appear in your device after synchronization finishes.
If you get an error message similar to “The application [app name] was not installed on the [device model] [device name] because its resources have been modified.“, extract the contents of the zip file again and make sure you do not open the app folder before dragging it to iTunes.
The above procedure is known to fail in some scenarios. If you are unable to install the app after a couple of retries, try the advanced instructions below.

Advanced instructions for Windows

1. Download and install the iPhone Configuration Utility (iPCU) for Windows from Apple (http://www.apple.com/support/iphone/enterprise/ ).
Warning: The iPhone Configuration Utility might already be installed. If so, simply repair the installation to upgrade to the latest version.
Warning: The installer might request to install .NET Framework 3.5 Service pack 1. You can download it from here:
2. Connect your iPhone/iPod touch/iPad to your computer.
3. Close iTunes, if it is open, before launching iPCU.
4. Launch iPCU from Start > All programs > iPhone Configuration Utility > iPhone Configuration Utility or from C:\Program Files\iPhone Configuration Utility\iPCU (or similar). You should see your device appear in the Devicessection on the left side of the window.
5. Add the provisioning profile (mobile provision) to the iPCU Library: Click on Provisioning Profiles, then drag the .mobileprovision file into the Provisioning Profiles pane.
6. Add the application to the iPCU Library: Click on Applications, then drag the app into the Applications Pane. On Windows, the app will be a folder, named something like YourAppName.app.
7. Access your device: Click on your device in the list of devices on the left. You should see five tabs appear in the main window: Summary, Configuration Profiles, Provisioning Profiles, Applications, and Console.
8. Install the Provisioning Profile: Click on the Provisioning Profiles tab of your device. You should see your Ad Hoc Provisioning Profile in the list of profiles. In the Install column you should see either a button that says Install or a button that says Remove (if youve installed this profile previously).
9. Install the app: Click on your devices Applications tab. You should see your app in the list of applications. In the Install column you should see either a button that says Install or a button that says Uninstall(if youve already installed the app).

MobileAutomation - Handle Pop-ups, Alerts and Prompts in Automate and App Automate Tests

This article shows you how to handle user permission pop-ups, alerts, and prompts in your automated tests on BrowserStack. Introductio...